

How to install a commercial kitchen faucet with a pre-rinse function?
With the new commercial kitchen faucet that comes with a pre-rinse sprayer, you are ready to complete an installation that will give you the ability to remove grease and slime from your dirty kitchen utensils easily. You will achieve maximum efficiency with the pre-rinse sprayer and remove your kitchen cleaning tasks. To get this, the installation has to be done correctly. It needs to be done correctly, so you will not have to smell needless leaks or airless weak sprayers in your busy kitchen. As a final guide to your installation, you will be provided with a thorough guide to get the installed faucet to operate efficiently from the first use.
The Importance Of A Site Survey Before Installations
Ensure that when preparing to install commercial kitchen faucets with pre rinse, that you do NOT just jump in with both feet in an attempt to install them immediately, as it could lead to problems in your installation workflow later down the line. This is where the Site Survey comes in. You need to understand that the majority of these taps are wall-mounted, which is why you need to take special note of the wall behind the sink. If it is wall tile, concrete block, or even drywall. It is super important that before installation, you check the strength of the wall. It needs to be able to take a lot of stress, as there are constant heavy-duty pre-rinse hoses. It is also important that you find wooden studs or solid masonry behind the wall, as it will be a reliable surface to mount your installation.
From here, look at the plumbing. Locate which line is the hot and which line is the cold water supply. Make sure the shut-off valves work and that they can be accessed easily. Because this is something that is frequently skipped, checking the water pressure is a good idea. Most commercial systems work okay, but knowing what your water pressure is helps. Lay out the parts you retrieved from the faucet box. You should have the faucet body, the pre-rinse spray wand and its hose, the diverter valving, the mounting hardware, supply lines, and other items like washers and O-rings. It is helpful to double-check the parts list and diagrams. This is a good way to make sure you understand how the system assembles, and no piece is missing. Lastly, get your tools. You should have a good level, an adjustable wrench, a set of screwdrivers, some plumber's tape, a drill with the right bits for your wall, and safety glasses.
Solid Mounting and Core Plumbing Connections
With the plan in order, it is finally time to start the physical installation. Your main priorities should be complete stability and perfectly sealed connections. First, take the heavy-duty mounting bracket or mounting template and set it against the wall. Make sure to use the level to double-check it is perfectly straight. If it is even slightly off, the faucet may look tilted and it could affect the hose retraction. Make your drill point marks, and then securely fasten the bracket to the wall, making sure to drill into the studs or use heavy-duty wall anchors designed for the weight. This mounting bracket is the backbone of the entire set up, so it needs to be in place.
After the bracket is steady, the main faucet may be attached to the spout or body. From below, attach the water supply lines. For their durability and kink resistance, it is recommended to use the stainless steel braided hoses. To create a seal, apply plumber's tape clockwise to the faucet's threaded inlets. First, hand-tighten the connecting nuts, and then make a final quarter turn for a firm seal using a wrench. Be careful not to overtighten, as it can damage the threads. Next is adding the pre-rinse integration. The sprayer hose connects to the diverter valve's outlet, which is usually a piece of the faucet body. Make sure the connection is as snug as a bug, and that the hose smoothly and untangled leads to the docking area. Pre-routing the hose avoids wear and docking malfunction.
Integrating and Testing the Pre-Rinse System
Time to activate our signature pre-rinse feature and verify that it functions correctly. Prior to restoring water pressure, visually confirm that all connections are secure, especially the diverter and all junctions associated with the pre-rinse assembly and sprayer hose. Then you can proceed to slowly re-open the main water supply. To begin, keep the pre-rinse sprayer docked. You’ll want to test the standard flow from the main faucet spout with the hot and cold handles. Check for any leaks that may be present at the base, handles, and supply line connections for the faucet. After the faucet is turned on, let the water flow for a minute to alleviate any debris build up in the new lines.
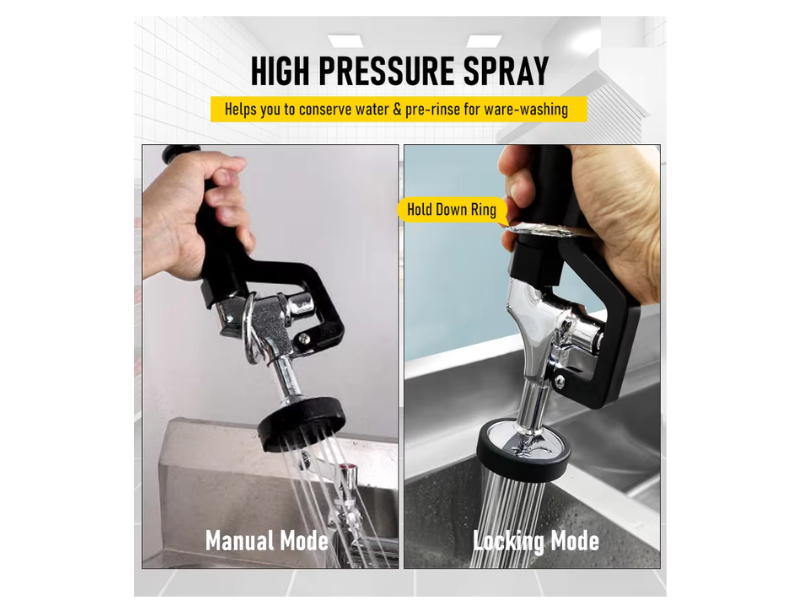
Next, you need to turn on the pre-rinse function. This usually will involve pulling the spray wand out of its dock, which will automatically engage the diverter valve that will stop flow to the main spout and redirect the flow to the sprayer. Test the sprayer over the sink. While testing the sprayer, you will want to cycle through all of the spray settings. Normally, one of the settings is for a high-velocity spray and a focused stream that is usually used for cleaning stuck on grime, while the other setting is a wider, softer spray that is usually used for rinsing. While testing the sprayer, feel the spray pressure and watch the pattern that the spray makes. You will also want to take note if. the sprayer switches settings smoothly, and if the hose extends and retracts smoothly without getting stuck. You will need to listen very carefully for unusual sounds that indicate a problem, such as excessive vibration or whistling sounds that usually indicate a problem with the sprayer. This testing process will help you find and fix any potential problems with the sprayer so you don’t discover the problems while you are very busy in the kitchen and require the sprayer. If the sprayer has weak pressure, that could indicate a problem with the diverter valve, the installed hose, or the water pressure in the building.
Last Touches and Operational Transfer
Just seeing water flow from the faucet doesn't finish the installation. The polish phase involves fine-tuning the installation, training the staff, and setting the faucet up for its long-term function. Make sure all the mounting nuts and handle attachments are snug, but don't overdo it. Clean the whole faucet and sprayer to remove any installation fingerprints from the finish. Check the maintenance tips from the manufacturer. Cleaning the spray head filter is one common tip, but there are others like checking the hose for wear from time to time.
Realistic kitchen staff who will use the faucets daily need operational briefings. Teach them the proper technique for pulling and docking the sprayer to avoid damaging the docking mechanism or the hose. Show them the proper techniques for different modes of spray and when it is best to use each. While the faucet is an industrial pre-rinse sprayer, educate them that it is not a tool to pry open anything or to knock off food that is stuck. This brief introduction will protect your investment. It is also suggested to keep the installation guide, warranty information and model number in a common location. In the future, should it be necessary to order a certain replacement part, like a diverter valve cartridge or a new spray head, having this information on file will optimize efficiency and will reduce downtime. A pre-rinse faucet that has been correctly installed is an essential tool for efficiency in the kitchen. These final steps will make sure it remains one for a long time.